
You've shaved in the morning, felt smooth for half a day, and by evening the skin already feels rough again. Or you've booked waxing, paid salon prices, then spent the next day babying irritated skin. That's usually the moment people start looking up Sugaring selber machen.
Done well, sugaring feels less like a quick fix and more like a smart home treatment. The ingredients are simple. The technique is learnable. The difference between a sticky mess and a clean result usually comes down to details that basic tutorials skip, especially hygiene, temperature, and how you move the paste on the skin.
Why DIY Sugaring Is Your Next Skincare Ritual
Sugaring has stayed relevant because it solves two common complaints at once. People want smoother skin, but they don't want the harsh feel that often comes with repeated shaving or badly executed waxing. A well-made sugar paste can be gentler on the skin barrier, and that's a big reason it has become part of many home body-care routines.
In Switzerland, interest in at-home sugaring hasn't been niche for a while. The Swiss DIY sugaring market has grown 35% annually since 2018, and a University of Zurich study found that 94% of participants using the standard DIY paste reported fewer skin irritations than waxing, with 3% reporting minor redness compared with 28% for waxing users, as cited by Utopia's guide to making sugaring paste.
Why skin often tolerates sugaring better
The practical appeal is simple. Sugar paste is workable at a lower temperature than many waxes, it rinses away with water, and when the technique is right it can feel less aggressive on the surface of the skin.
That doesn't mean it's foolproof. Home sugaring still asks for patience, clean handling, and realistic expectations. If your hair is very coarse, your skin is reactive, or you're trying to treat awkward zones on your own, a professionally formulated product can be the more reliable route.
Sugaring works best when you treat it like skincare with technique, not like a kitchen shortcut.
For people comparing methods, it also helps to understand where sugaring sits in the wider hair-removal picture. If you're also weighing waxing and want context on maintenance and timing, this guide to achieving smoother skin after waxing gives a useful comparison point.
Why retailers and spas should pay attention
Swiss consumers are clearly drawn to natural ingredient stories, but they also expect standards. That matters for pharmacies, spas, and beauty retailers. Anyone advising customers on home sugaring should go beyond “mix sugar and lemon” and speak about storage, skin prep, and when to stop improvising and use a proper product instead.
A good sugaring session starts long before the first pull. It starts with what you buy, how you cook, and how disciplined you are about cleanliness.
Gathering Your Tools and Natural Ingredients
The ingredient list is short. The tool list is modest. The quality decisions still matter.
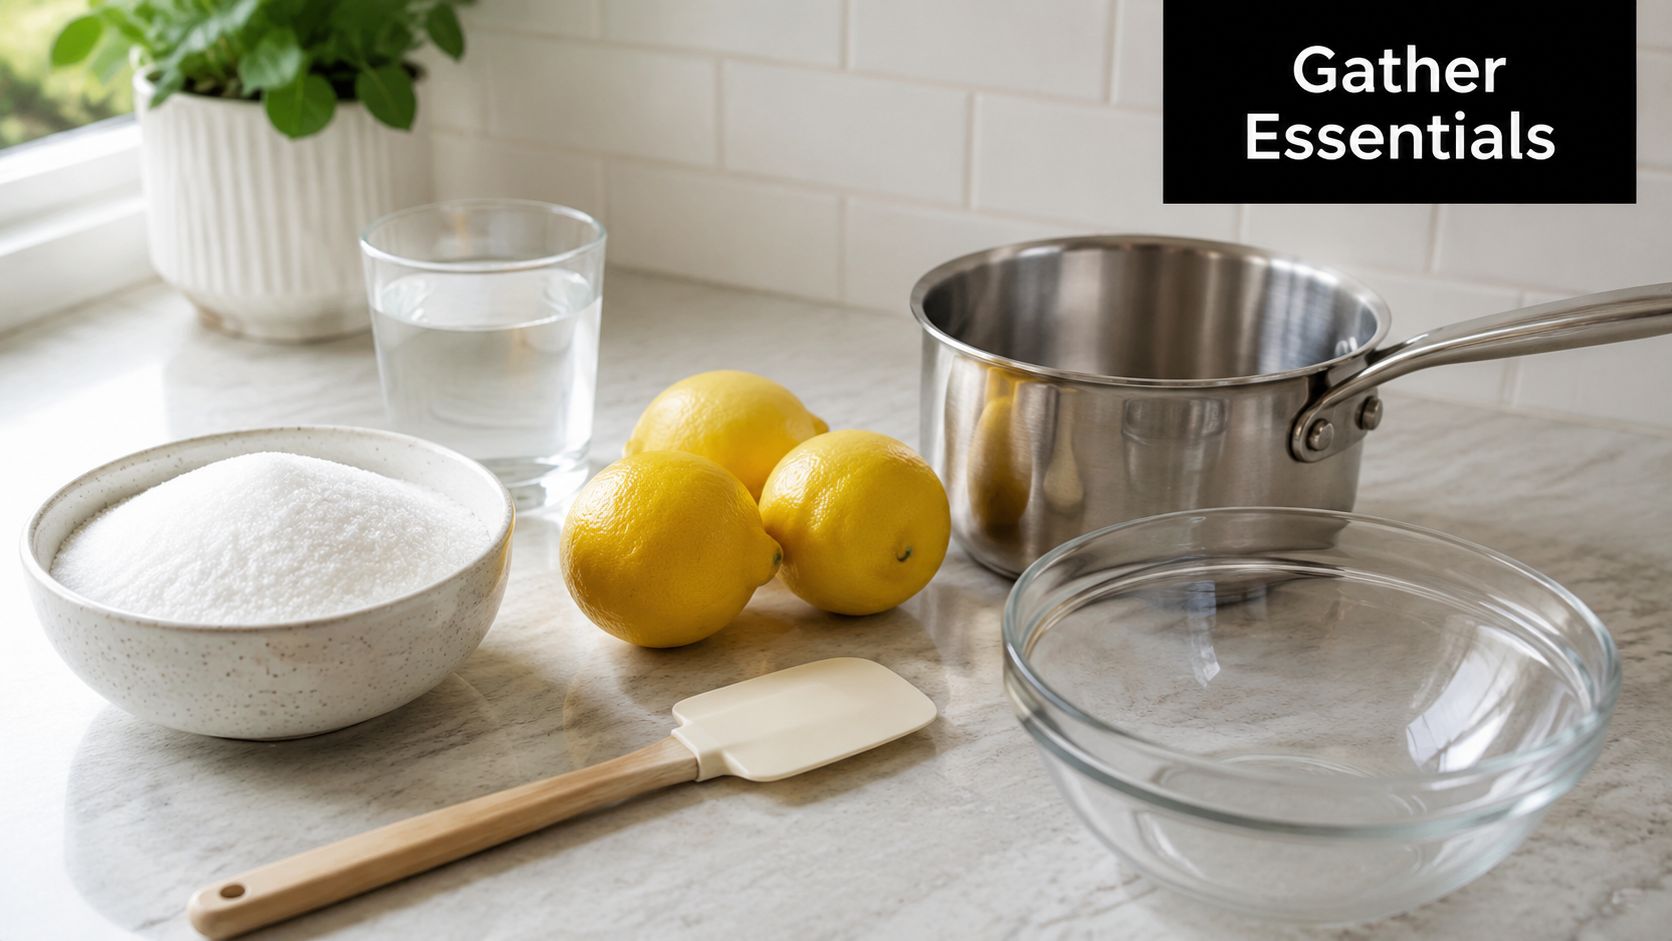
What you actually need
Set everything out before you turn on the hob. Sugaring goes wrong fast when you start searching for a jar or spoon halfway through cooking.
- White sugar. Plain granulated sugar gives the most predictable texture.
- Fresh lemon juice. Freshly pressed juice is the safer choice for consistency.
- Water. Keep it measured, not guessed.
- A small heavy-bottomed saucepan. Thin pans create hot spots and burn the syrup.
- A heatproof spoon or spatula. Silicone works well.
- A clean airtight container. Glass or another food-safe container with a secure lid.
- A larger bowl or basin for a cold water bath. This matters more than most DIY recipes admit.
- Optional but helpful tools. A thermometer, disposable gloves, reusable strips if you prefer strip removal, and baby powder for skin prep.
Why ingredient quality matters
Sugaring sounds rustic, but the process is surprisingly technical. Fresh lemon juice helps the paste behave more predictably than bottled juice. The goal isn't gourmet cooking. The goal is a paste that stays pliable rather than turning grainy, brittle, or overly tacky.
If you're shopping with a natural beauty mindset, keep the same standards you'd apply to skincare. Choose simple ingredients, keep your equipment clean, and don't assume “homemade” automatically means safer.
A few points make the biggest difference:
- Fresh lemon over bottled because the paste responds better when the acidity is more consistent in use.
- Measured water because eyeballing leads to texture problems.
- A sturdy pot because even heating gives you a larger margin before the sugar goes too dark.
- Clean storage because this is still a food-based cosmetic mixture going onto skin.
Practical rule: Convenience ingredients often create expensive mistakes. Fresh lemon, measured water, and a proper pan save more time than any shortcut.
Tools that improve the session
Professional results often come from simple add-ons rather than fancy gadgets.
A thermometer helps if you're nervous about overheating the paste. Gloves help if you dislike the sticky hand method. Powder is especially useful because the paste grips hair better when the skin is dry and free from lotion, oil, and sweat. If you work in a pharmacy, spa, or retail environment, this is the kind of advice clients remember because it changes the result.
Home paste can work beautifully. But if you know you want repeatable texture every time, or you're serving clients rather than treating yourself, professionally formulated sugaring products remove a lot of guesswork.
Crafting the Perfect Sugaring Paste at Home
Most DIY attempts succeed or fail at this point. Not because the recipe is complicated, but because sugar changes very quickly once heat builds.
The Swiss Federal Office of Consumer Protection recommends a ratio of 200g sugar, 1 tablespoon water, and 2 tablespoons lemon juice, and a Swiss Aestheticians survey found this recipe was perceived as 40 to 50% less painful than traditional waxing, as described in NIVEA Switzerland's sugaring overview.
For a visual overview, this process guide helps: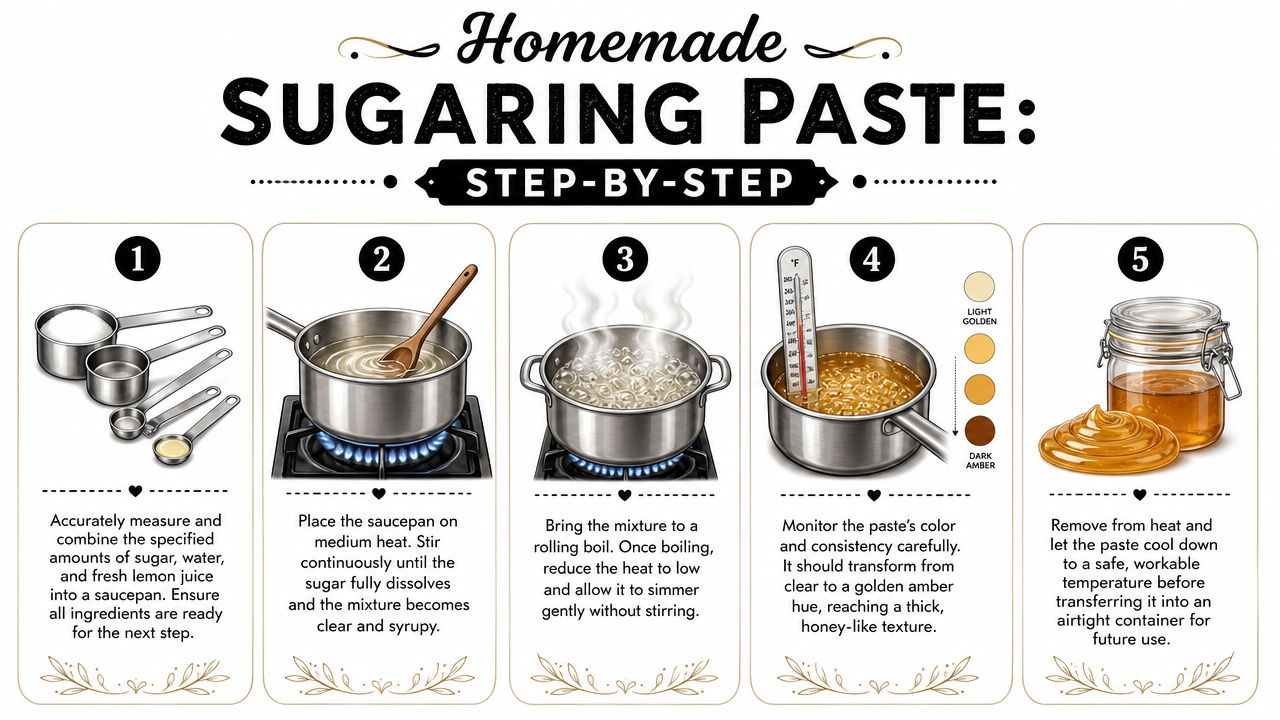
The Swiss standard recipe
Use exactly:
- 200g sugar
- 1 tablespoon water
- 2 tablespoons fresh lemon juice
Put all three into a small saucepan before heating. Don't add ingredients in stages. You want the mixture to dissolve evenly from the start.
What the cooking stages should look like
Start on medium heat and stir until the sugar dissolves. At the beginning, the mixture looks cloudy, then clear and syrupy. Once it begins to boil, reduce the heat.
From there, watch more than you stir. The paste should move through a colour shift from clear to pale gold and then to a deeper honey or amber tone. If it turns dark too fast or smells burnt, it has gone too far.
Three cues matter most:
- Colour. Aim for golden amber, not brown.
- Texture. It should look like warm honey, not watery syrup.
- Smell. Sweet and caramel-like is fine. Bitter means stop.
Why cooling is part of the recipe
Once the paste reaches the right stage, remove it from heat immediately. Then place the pot into a larger vessel of cold water. This water-bath cooling method helps stabilise the temperature rather than letting residual heat continue to cook the paste.
That's one of the least discussed professional habits, and it matters. Sugar retains heat. If you leave the pot on the side and walk away, the mixture can overshoot from workable to too hard without any extra flame.
If the paste keeps darkening after you've removed it from the hob, it was still cooking in the pan. Cool the pot, not just the room around it.
How to know when it's ready for use
Don't put hot paste on skin. Let it cool until it's safe to handle. The paste should feel pliable, stretchy, and dense enough to hold shape when scooped.
If you use a thermometer, that can help you stay calm through the process. If you don't, rely on touch only after the container is no longer dangerously hot. Test a tiny amount first.
Transfer the cooled paste into a clean airtight container. If it sets firmer than expected, don't panic. Slightly firm paste can often be softened later with gentle warming and kneading. Burnt paste cannot be rescued.
For first-timers, this is the honest trade-off. Homemade paste is inexpensive and satisfying, but the learning curve is real. If you need consistency for sensitive zones, or if you prefer to avoid trial and error, pre-formulated professional paste can be the better decision.
Mastering the Application and Removal Technique
A good paste with bad technique still gives poor results. This is the step people underestimate. They think the recipe is the hard part. It isn't. The hand movement is.
Prepare the skin properly
Before the paste touches the skin, the area must be clean and dry. No body oil, no rich cream, no fresh lotion film. If the skin feels at all slick, dust a very light layer of baby powder over it.
This isn't cosmetic fussiness. Proper prep changes how the paste grips. Dry skin gives the paste traction. Oily skin makes it slide.
Use this quick checklist:
- Clean first with mild soap and water, then dry thoroughly.
- Powder lightly if there's moisture, sweat, or residue on the skin.
- Work in small sections rather than trying to cover a large area at once.
- Test one patch before moving into more sensitive zones.
The salon-style hand method
Take a small piece of paste, about enough to knead comfortably between your fingers. Work it until it becomes supple. Then flatten it onto the skin.
The movement has two directions, and confusing them is where many beginners struggle.
- Apply the paste against the direction of hair growth.
- Remove it with a quick flick parallel to the skin in the direction of hair growth.
That second point is important. Don't pull up and away from the body. Pull low and fast, almost as if you're skimming along the skin rather than lifting from it. This helps reduce unnecessary tugging.
Keep your wrist close to the body. The motion is a flick, not a peel.
How different areas behave
Not every body zone responds the same way. Flat, easy areas forgive mistakes. Curved and high-friction areas don't.
A few practical adjustments help:
- Legs are the easiest place to learn because the surface is broad and the hair direction is usually easier to read.
- Knees need the skin held taut. Bend or straighten the leg until the area feels firm, not creased.
- Underarms are awkward because hair often grows in more than one direction. Split the area into smaller sections and change your application angle as needed.
- Bikini line demands patience. Use smaller amounts of paste and avoid repeated passes over irritated skin.
- Arms usually respond well, but fine hair may need a slightly firmer flick.
What a good pull feels like
A clean pull feels decisive. The paste releases quickly, the skin stays relatively flat, and you don't feel yourself dragging upward. If you need to tug slowly to get the paste off, something is wrong. Usually the paste is too soft, the skin wasn't dry enough, or the section is too large.
After each pass, press your free hand gently onto the skin for a second. That small habit can make the treatment feel calmer, especially on sensitive spots.
When to stop and switch methods
Home technique has limits. If the paste keeps collapsing, your angle feels unsteady, or the skin starts looking overworked, stop. Clean the area with lukewarm water and reassess later.
There's no prize for forcing a DIY session to work. For beginners, or for professionals advising clients, the sensible message is this: use homemade paste for manageable areas and simple maintenance. Choose salon treatment or professional-grade products when the area is delicate, the hair is coarse, or consistency matters more than experimentation.
Essential Aftercare and Safe Paste Storage
You finish a clean pull, the skin looks fine, and the temptation is to get dressed and move on. This is the point where good DIY work can unravel. Freshly sugared skin is more exposed than it looks, and leftover paste can become unhygienic long before it looks spoiled.
What the skin needs right after sugaring
Start with water. Rinse off any residue with lukewarm water, pat the area dry with a clean towel, and keep products to a minimum for the rest of the day if the skin feels warm or reactive.
I tell clients to treat the area like freshly exfoliated skin, because that is exactly what it is. Hair has been removed from the root, dead surface cells have lifted with the paste, and the follicle opening stays more vulnerable for a short period. Heat, friction, sweat, and perfume are the usual triggers for redness after an otherwise good session.
For the next 24 to 48 hours, keep the routine strict:
- Skip hot baths, saunas, and steam rooms. Heat can increase redness and make the area sting.
- Avoid training that creates rubbing or heavy sweat if you treated underarms, inner thighs, or the bikini line.
- Hold off on scrubs, acids, and retinoids until the skin feels fully settled.
- Wear loose, breathable clothing over body areas that were just sugared.
- Use plain, soothing care instead of fragranced lotions or active body products.
A light, bland formula is usually enough. If you like oils or barrier balms after hair removal, these dupes for smooth skin can help you compare textures before choosing one.
Why storage needs stricter hygiene than many tutorials suggest
Homemade sugaring paste is simple, but it is still a water-exposed product that comes into contact with hands, skin, and bathroom air. That changes the hygiene picture quickly.
Swiss hygiene guidance for cosmetic handling places strong emphasis on clean tools, closed containers, and avoiding repeated contamination during use. That standard matters at home too. If fingers go back into the jar, the lid stays loose, or the container sits in a warm bathroom, the paste is no longer as clean as the day you made it.
Professionally formulated products have an advantage here. They are produced for more predictable stability, repeat handling, and clearer shelf-life control. For occasional home use, a small homemade batch can work well. For regular use, shared household use, retail resale, or spa service, a professional formula is the safer choice.
How to store leftover paste safely
Transfer cooled paste into a clean, airtight container and store it in the refrigerator. Use a sanitized spoon or spatula each time rather than dipping in with your hands. In Swiss salon practice, single-use access or freshly disinfected tools are standard for a reason. They reduce contamination at every step.
Check the paste before each session. Discard it if you notice an off smell, unusual cloudiness, separation, or any texture change that does not improve with gentle warming.
Small batches are smarter than ambitious ones. If you only sugar every few weeks, make less, use it promptly, and replace it sooner rather than trying to stretch one jar beyond what hygiene allows.
Troubleshooting Common DIY Sugaring Problems
A DIY sugaring session usually goes wrong in familiar ways. The paste was cooked a little too far, the skin held more moisture than expected, the removal angle was off, or the paste behaved differently in your kitchen than it did in the recipe video. Practical experience matters here. Good troubleshooting starts with reading the failure correctly, because the fix for brittle paste is not the fix for paste that smears.
In salon work, I look at three things first. Paste texture, skin prep, and hand technique. If one of those is off, changing the recipe alone rarely solves the problem.
Common Sugaring Issues and Fixes
| Problem | Likely Cause | Solution |
|---|---|---|
| Paste turns hard and brittle | Overcooked paste, off-ratio ingredients, poor cooling control | Warm it gently and test again if it is only slightly firm. If it is deeply brittle or dark, make a fresh batch and stop the cooking earlier next time |
| Paste stays too runny | Undercooked mixture or too much moisture | Reheat briefly with care, or start again and cook to a deeper honey-amber stage |
| Paste crystallises while cooling | Ratio drift, inconsistent heat, or ingredient variation | Use exact measurements, keep the heat steady, and use fresh lemon juice if your previous batch crystallised |
| Paste won't grip hair | Skin is oily, damp, or carries product residue | Clean and fully dry the skin, then apply a light dusting of powder |
| Paste sticks to skin more than hair | Paste is too soft, too warm, or overworked in one area | Let it cool slightly, work in smaller sections, and stop on irritated skin |
| Bruising or strong pulling discomfort | Pulling upward instead of parallel, skin not held taut | Stretch the skin firmly and flick low, fast, and close to the surface |
| Good result on legs, poor result in underarms | Mixed hair directions | Divide the area into smaller zones and adjust your application angle for each one |
| Paste keeps failing in some Swiss regions | Water minerals and inconsistent measuring affect texture | Measure carefully, watch consistency instead of cooking by time alone, and switch to a professional paste if batches stay unpredictable |
Commonly misread texture problems
Hard paste does not automatically mean you need more water next time. In practice, it usually means the batch stayed on the heat a little too long, or the residual heat in the saucepan kept cooking it after you took it off the hob. That is a common home mistake.
Runny paste causes the opposite error. Beginners often stop cooking too early because they are trying to avoid burning the sugar. The result is a paste that spreads nicely but collapses on contact, sticks to skin, and fails to grab shorter hair.
Crystallisation sits in the middle. It can come from ratio errors, uneven heating, or ingredient inconsistency. If a batch starts turning grainy as it cools, do not keep kneading and hope it will recover. It usually will not.
Why water and environment matter in Switzerland
Swiss home users often follow the same recipe and still get different results from one canton to another. Local water mineral content can affect how predictable the paste feels, especially if the measurements were approximate to begin with. Bathroom humidity also matters. On a damp day, paste softens faster, skin stays less dry, and adhesion drops.
That is why Swiss hygiene-minded practice relies on control. Measure carefully. Work on dry skin. Use clean tools. Keep the container closed between passes. The more variables you remove, the easier the session becomes to repeat safely.
A recipe should guide you, not trap you. Watch colour, elasticity, and handling, not just the clock.
Some failed DIY batches come from good recipes used with inconsistent heat, moisture control, or handling.
When the problem is technique, not paste
If the paste looks right but the result is patchy, the hands are usually the issue. Apply against the direction of growth. Remove with the direction of growth. Keep the pull parallel to the skin, not upward. Hold the skin taut before every flick.
Area size matters too. Large sections tempt beginners, but they reduce control and increase sticking. Small sections give cleaner removal and less irritation, especially on underarms, bikini edges, and any area with changing growth patterns.
Know when to stop troubleshooting
Home paste can work very well for occasional use. It is less forgiving when you want repeatable results, stricter hygiene control, or treatment consistency across multiple users. If you keep getting crystallisation, unstable texture, or poor performance on sensitive zones, a professionally formulated sugar paste is often the smarter option.
That matters even more for retailers, pharmacies, and spas. Clients need products that behave predictably, store more reliably, and support cleaner handling standards. Trial and error is fine for learning at home. It is a weak standard for regular service.


