
You've left it late. The outfit is undecided, the invitation says “costume encouraged”, and you want a look that reads instantly in candlelight, selfies, and real life without coating your face in scratchy paint from a novelty aisle.
That's exactly where easy Halloween makeup earns its keep. The best quick looks don't rely on prosthetics, glue-heavy tricks, or a drawer full of theatrical products. They rely on structure, contrast, and formulas that sit well on the skin. If you shop in Swiss pharmacies, premium beauty retail, or spa-led cosmetic spaces, that matters. Halloween should be playful, but it shouldn't come at the expense of comfort.
There's a clear reason this category has become so mainstream in Switzerland. A 2023 YouGov survey found that 36% of adults in Switzerland planned to celebrate Halloween, and 27% said they would buy Halloween-related products, with costumes and makeup among the most common purchases, as noted in this Halloween beauty overview. Younger adults were especially likely to participate, which fits the last-minute, low-fuss nature of easy Halloween makeup.
Beyond the Ghost Sheet Easy Halloween Makeup for Modern Tastes
Easy doesn't have to mean childish, flat, or harsh on the skin. A polished Halloween face often comes from using your standard makeup bag more intelligently, not buying more products. That's why I prefer looks built from complexion staples, one dependable liner, a neutral shadow, and a lip colour with intent.
For readers who want a fast decision, start here.
Quick Look Selector
| Look | Difficulty | Est. Time | Key Product |
|---|---|---|---|
| Ethereal galaxy freckles | Beginner | 20 minutes | Shimmer eyeshadow or highlighter |
| Chic modern vampire | Beginner to intermediate | 20 minutes | Deep berry or burgundy lip colour |
| Cracked porcelain doll | Intermediate | 20 minutes | Fine black liquid eyeliner |
This is also where a modern beauty standard changes the brief. Many Halloween tutorials still assume you're happy to use whatever stains hardest and washes off eventually. I'm not. If a look can be built with elegant, skin-respectful formulas and removed without a battle, it's a better look from the start.
What makes a look worth doing
A useful Halloween look should do three things well:
- Read immediately: The idea should be recognisable without needing a full costume explanation.
- Use familiar products: Standard cosmetics are easier to control than novelty face paint.
- Leave the skin calm: If a formula tends to sting, flake, or cling unevenly, skip it.
Easy Halloween makeup works best when the products already belong in a well-edited beauty routine.
If you're still deciding between full makeup and a digital fallback for invitations, mood boards, or quick costume planning, DreamShootAI's witch filter can be a helpful reference for shape, mood, and styling before you commit to a real look.
The clean beauty trade-off
There is a trade-off, of course. Some special-effects products deliver intensity fast. But they can also crack, transfer, or feel uncomfortable after an hour. High-quality complexion products and eye products may require a touch more placement discipline, yet they usually wear better and look more polished up close.
That's the philosophy behind the three looks below. They're fast, they photograph well, and they avoid the usual Halloween shortcut of piling on irritating products and hoping for the best.
Create Your Canvas Skin Prep for Lasting Halloween Looks
Good Halloween makeup starts before the first line of eyeliner. Most failures blamed on “bad application” are really prep problems. Texture catches. Pigment skips. Liner bleeds. Shadow grabs in one patch and disappears in another.
The fix is technical, but simple. For an easy Halloween makeup workflow, the most reliable method is to work on a matte, fully set base, then place high-contrast details only after the eyelid and complexion have been powdered. A beginner tutorial demonstrating this approach uses concealer as a primer and then sets it with pressed powder before pigment work, which makes later line work easier to control, as shown in this step-by-step video tutorial.
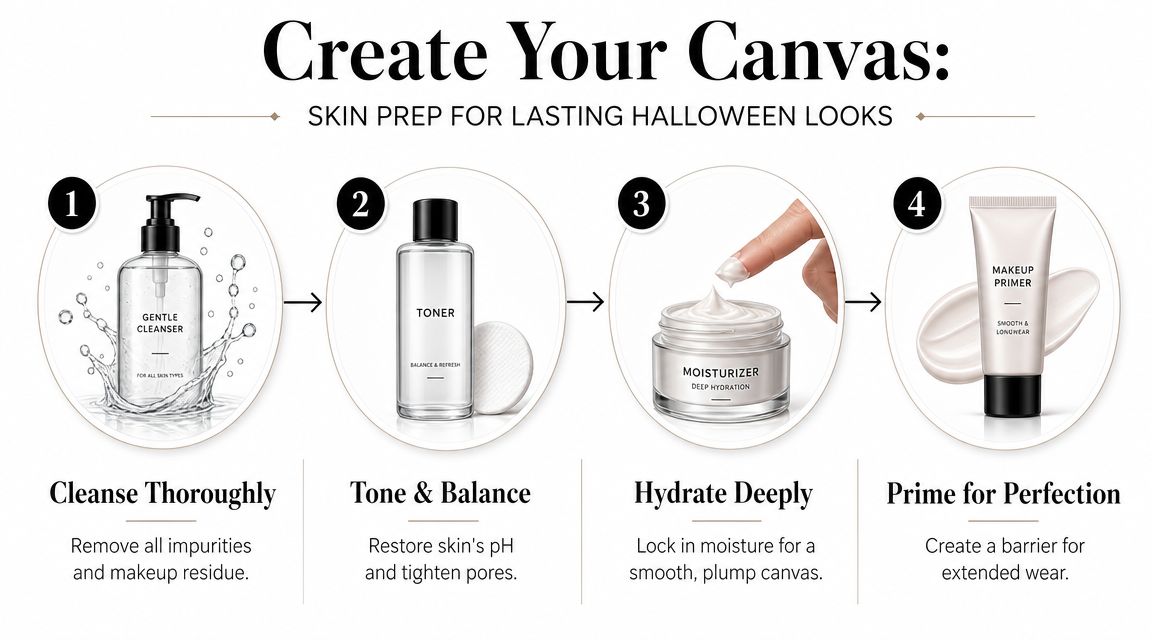
The prep sequence that actually helps
You don't need a complicated ritual. You need the right order, thin layers, and enough time for each layer to settle.
Cleanse gently
Remove sunscreen, skincare residue, and oil without stripping the skin. If the face feels squeaky, the cleanser was too aggressive.Hydrate lightly
Use a moisturiser that softens but doesn't leave slip. Rich cream can work, but not if it leaves a film.Prime with purpose
If you use concealer on the lids or around the eyes, keep it thin. More product does not create better hold.Set before details
Press powder over the areas that will carry liner or graphic shapes. This is the step many people rush, and it's the reason lines often wobble or skip.
A good rule for Halloween is to prep for control, not glow. Dewy skin is beautiful in many contexts, but graphic looks need traction.
Why layering matters
When skincare and makeup start pilling against each other, the culprit is usually too much product or poor sequencing. If you want a refresher on order and texture compatibility, this guide to expert advice on skincare layering is a sensible reference.
Artist's note: If your liner drags, don't add more liner first. Check whether the base underneath is still creamy.
A small kit beats a chaotic one
For quick Halloween looks, I'd rather see someone with five reliable items than fifteen random ones. A compact setup keeps the hand steady and the decisions clean:
- Primer or concealer: Enough to even the surface.
- Setting powder: Pressed or loose, as long as it removes tackiness.
- Black liner: Cream or liquid, depending on your comfort level.
- Neutral brown shadow: For contour, smoke, and soft shading.
- Small smudging or angled brush: Precision matters more than quantity.
That kit supports all three looks in this article and avoids the clutter that usually leads to muddy results.
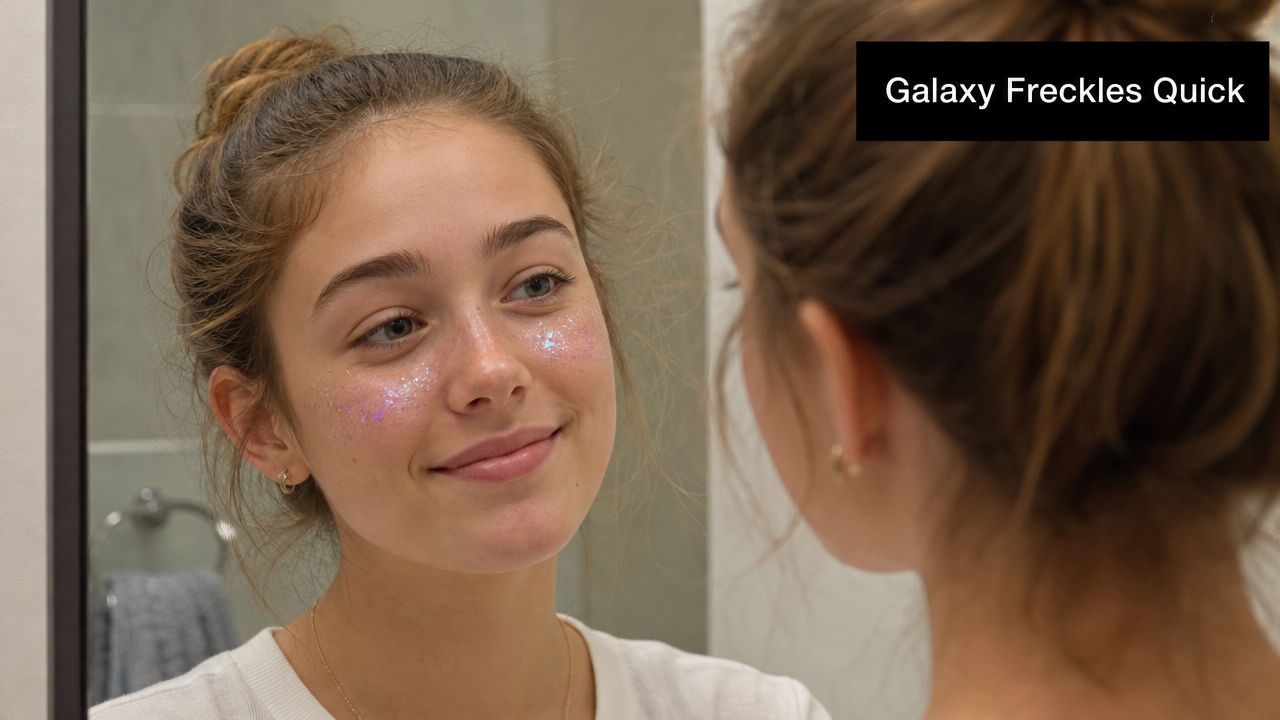
Tutorial 1 Ethereal Galaxy Freckles in Minutes
Galaxy freckles are my favourite recommendation for beginners because they look intentional even when they're slightly irregular. In fact, a bit of asymmetry makes them feel more celestial and less costume-counter.
What to pull from your makeup bag
This look doesn't need specialist products. Use what you already trust on your face.
- A sheer to medium base: Skin should still look like skin.
- Soft taupe or brown shadow: This gives shape around the eyes.
- Blue, violet, or silver shimmer: Any pressed shadow with light reflection works.
- Highlighter: Cream or powder, depending on your usual preference.
- Brown or black pencil: Optional, for extra star points or tiny dots.
The charm comes from placement. You're not painting a mask. You're creating small clusters of light.
How to build it
Start with your prepared base and keep the rest of the complexion soft. A touch of concealer under the eyes and a little powder through the centre of the face is enough. Then wash a muted taupe or soft brown through the crease and under the lower lash line. This anchors the brighter shades without making the look heavy.
Next, tap shimmer onto the high points of the cheeks and across the bridge of the nose, where freckles would naturally sit. Use your fingertip for the first pass. It gives a scattered finish that's prettier than a perfectly packed brush application.
Add a second shimmer tone in a smaller area. Think silver over violet, or icy champagne over soft blue. This layering gives depth without demanding precision.
Imperfect placement helps here. Galaxy freckles should look sprinkled, not stamped.
For the “freckle” effect, use the tip of a pencil or a tiny brush to add a few dots around the shimmer clusters. Keep some dots larger, some softer, and some nearly invisible. If every mark matches, the effect becomes decorative rather than airy.
A moving visual can help if you want to see pacing and placement before you start:
The common mistake
The easiest way to spoil this look is to overdo the base. Full-coverage foundation plus heavy contour can make delicate shimmer freckles look disconnected from the skin. Keep the complexion breathable, and let the reflective pieces do the storytelling.
If you want a finishing touch, add a glossy balm to the lips and a little highlighter at the inner corners of the eyes. You'll look dressed for Halloween, not buried under it.
Tutorial 2 The Chic and Moody Modern Vampire
A modern vampire shouldn't look cartoonish. The strongest version is sharp, hollowed in selective places, and anchored by a lip with shape and depth. That's why this look benefits from structure more than product quantity.

Start with shape, not drama
Across beginner-friendly Halloween looks, the most useful technical pattern is shape first, fill second. Sketch the motif with a thin brush or pencil, establish symmetry, then pack in colour with short strokes. Tutorials for vampire, skull, pumpkin, and spiderweb looks use this method repeatedly, and they also warn against overblending because too much diffusion removes the contrast that makes the look readable, as explained in this Halloween tutorial guide.
For a vampire face, that principle matters most in two places:
- The lip line
- The cheek hollow
Map both before deepening either.
Build the face
Take a cool-toned brown eyeshadow and place it under the cheekbone, starting near the ear and tapering inward. Don't drag it too close to the mouth. The aim is a shadowed hollow, not a muddy stripe. Add a little of the same shade at the temples and just under the lower lip for a slightly drawn effect.
For the eyes, keep the darkness close to the lash line. Smudge brown or charcoal around the upper and lower lashes, then sharpen the outer corner with a touch of liner if you want more menace. This should feel smoky, not blown out.
Practical rule: Smudge only where you want mystery. Leave some edges crisp so the face still has architecture.
Create the lip that carries the costume
Outline the Cupid's bow first. Then mark the lower lip shape. Only when the shape feels balanced should you fill with colour. A deep berry, oxblood, or burgundy works beautifully.
For extra dimension, press a darker tone into the centre and keep the outer edge cleaner. If you want a subtle “freshly fed” effect, place a small amount of deeper red just inside the lower lip line rather than painting theatrical drips down the chin. It's more elegant and far more wearable.
If you'd like a final accent, draw one or two faint vein-like lines near the temple or neck with a very light hand, then soften with a fingertip. These details should whisper. If they shout, they look novelty.
What doesn't work
Three things usually flatten this look:
- Warm bronzer instead of cool contour
- Overblended smoky eyes
- A lip applied without first sketching shape
Keep the contour selective, the eye darkening controlled, and the mouth precise. The result reads “vampire” immediately, but still feels refined enough for a chic dinner, hotel event, or gallery party.
Tutorial 3 Artful Cracked Porcelain Doll Effect
This is the most graphic of the three looks, but it's still beginner-manageable because one tool does most of the work: a fine black liquid liner. If the liner is sharp and the base is smooth, the rest is just pattern.
The base that suits the concept
Porcelain works best on softly perfected skin. Use your usual complexion products to create an even finish, then mute warmth in the cheeks. You don't need stark white face paint. In fact, that often makes the look theatrical in a cheap way. A slightly lighter, velvety complexion with a satin-matte finish is enough.
Add a doll-like flush high on the cheeks if you like, and keep brows neat rather than heavy. Eyes can be simple. Taupe in the crease, liner close to the lashes, mascara with lift.
Mapping the cracks
Before reaching for liquid liner, lightly sketch the route of the cracks with a brow pencil. Start at natural tension points: the corner of the mouth, the outer eye area, the forehead near the hairline, or one cheekbone. Keep the lines irregular.
A realistic crack pattern usually includes:
- One main fracture line
- A few branching forks
- Variations in thickness
- Small breaks where the line stops and resumes
Trace over the pencil with black liner once the pattern feels balanced. Press lightly at first. Then increase pressure in selected spots to widen the line. That variation is what makes the effect look deliberate rather than doodled.
A crack should travel like it found weakness in porcelain, not like it was drawn with a ruler.
Where to stop
This look becomes stronger when you leave skin visible. One cheek and the forehead may be enough. Or one side of the mouth and a temple. Covering the whole face with fracture lines often reduces impact because the eye no longer knows where to look.
You can deepen the illusion by shading one side of a crack with a tiny amount of taupe or grey shadow. Place the shadow on only one side of the line and keep it close. The effect should suggest depth, not a smoky halo.
The clean beauty advantage
Quality liner really matters. A reliable formula gives you a dark line in one pass, without dragging over the set base or splintering at the edges. That means fewer corrections, less rubbing, and less temptation to layer product until the skin feels tight.
If you want the doll reference to feel stronger, pair the look with a muted pink lip placed neatly in the centre, or a slightly rounded lip line. Keep it restrained. The contrast between soft doll features and sharp fractures is what makes the look compelling.
The Great Un-Doing Gentle Removal and Skin Recovery
A Halloween look is only as good as its removal. Many quick tutorials overlook this, failing people with reactive skin, dry patches, eczema tendencies, or contact-lens sensitivity. The easy part shouldn't end at application.
That gap matters because Halloween content often leans on glue sticks, face paint, heavy liner, liquid lipstick, and false lashes without discussing safer alternatives or proper removal. In Switzerland, the FSVO warns that cosmetic products can cause irritation or allergy and that users should pay attention to ingredients and proper use, as highlighted in this discussion of easy Halloween makeup and skin sensitivity.
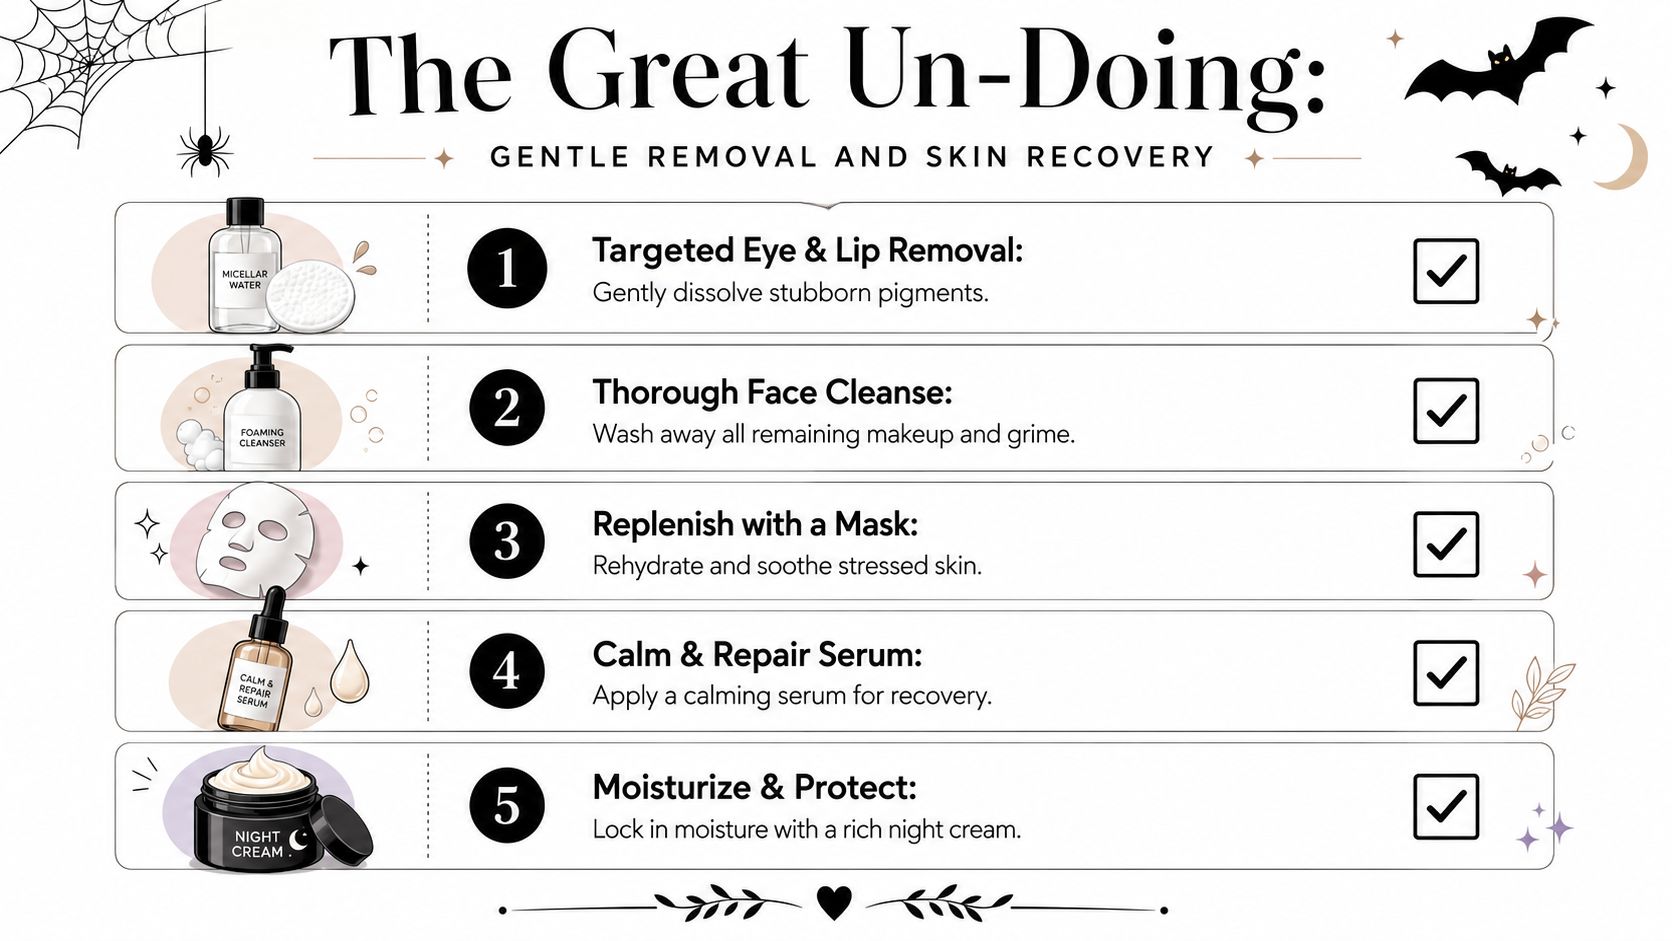
Remove with patience, not friction
The goal is to dissolve pigment, not scrub it off.
- Break down eye and lip products first: Use a gentle oil, balm, or dedicated remover on a cotton pad and hold it in place briefly before wiping.
- Follow with a full facial cleanse: This removes the loosened residue, powder, and sebum.
- Check the hairline and lash roots: Halloween makeup loves to hide there.
- Rehydrate immediately: A calming serum or moisturiser helps the skin recover from pigment and powder.
If your eyes are sensitive, this guide to a comfortable eye makeup routine for sensitive skin offers useful reminders about gentle removal habits around the eye area.
What I recommend skipping
Avoid the usual “clean-up hacks” that involve harsh rubbing, rough cloths, or repeated passes with foaming cleanser alone. Those methods often leave pigment behind while irritating the barrier. A cleansing balm or oil does the hard work more elegantly, especially for black liner and long-wear lip colour.
Skin recovery starts the moment you decide not to scrub.
The morning-after reset
If the skin feels warm, tight, or overworked, keep the next routine simple. Use a gentle cleanser, a hydrating serum, and a nourishing cream. Hold off on acids and strong exfoliants until the skin feels settled again.
That final step is easy to neglect because the costume is over. But in practice, removal and recovery are part of the look. They determine whether Halloween makeup feels like a fun ritual or a skin setback.
If you're a Swiss retailer, pharmacy, spa, or e-commerce partner looking for clean, premium beauty lines that align with skin comfort, ingredient transparency, and superior presentation, beautysecrets.agency is worth knowing. They curate natural and ethically sourced cosmetics and pharmaceuticals for the Swiss market, helping partners build assortments that feel both luxurious and responsible.


